This article will help those who read “Composing Orchestral Music In The Box: Part I” by providing detailed information in regards to orchestral realism using virtual instruments. The only thing better than having a section or solo instrument being played by a group of people or a single person is taking all the necessary steps to improve the reality of your virtual orchestral samples. Thinking of your samples as real people or a real person will help you get in the frame of mind of the players. It’s shocking how close to the real thing you can get to achieving the sound of a real player plucking the strings or blowing the horn with some time and calculated effort. In part I, we discussed the three steps to achieving this sound, with the first step being to select and purchase a sample library. The second step is all about the dots and lines; Automation. The third and final step is to ensure that you’re creating a bus for your reverb, selecting the correct reverb and routing each of your instruments to that reverb bus. Lastly, you must apply compression to your song to focus on specific solo instruments or to make a section of instruments more cohesive.
In part II, I’d like to go through a case study from when I recreated the ‘Star Wars’ theme of Rey by composers John Williams. Included is the blog post is the Logic Pro X project file itself, giving you a place to experiment and see how I used automation, reverb, and the other steps mentioned in part 1. Download the Logic Pro session file here. If you happen to use Cubase, Pro Tools, or something other than Logic, KEEP READING! These tips will apply to most all audio workstations.
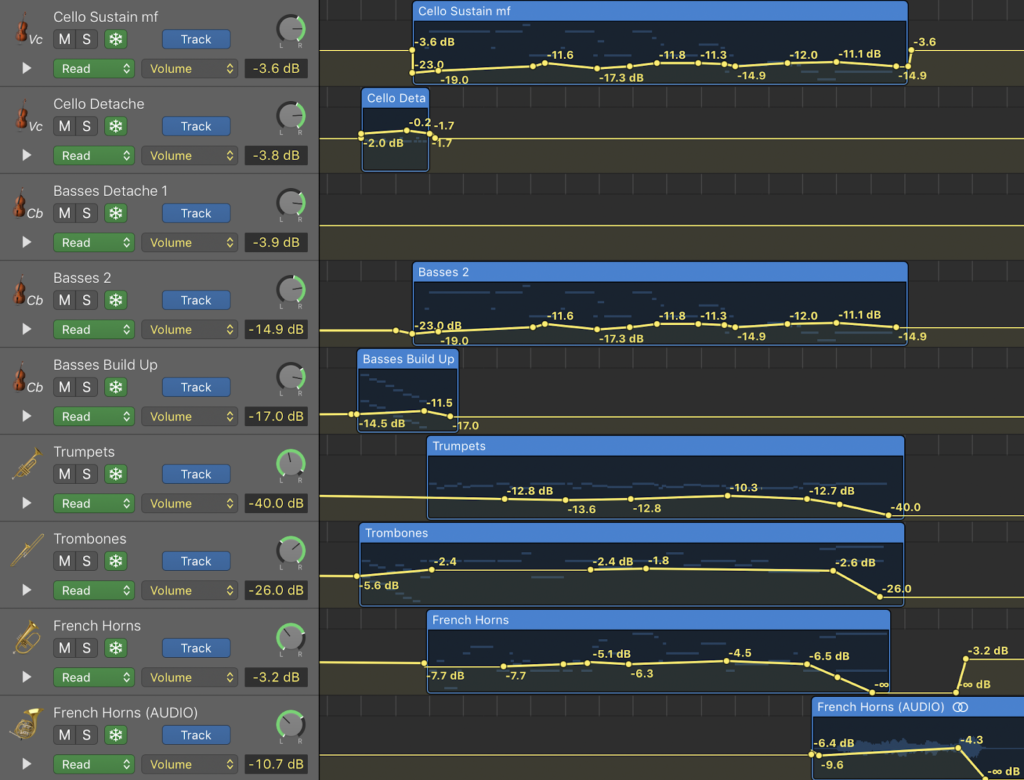
As you can see in this above example, I have multiple sections of instruments, all with automation in slightly different places. You usually wouldn’t want the automation to be exactly the same as each other unless it’s a section such as the example below (instruments in the same section playing the same melody) And even then, giving each individual instrument slightly different automation will help realism. Generally, each instrument will have its own specific automation based on what notes it’s playing and the type of expression you’re going for.
Pro Tip: A popular technique is to automate the actual “expression” versus the “volume”. So what I’ve always done is actually just automate the volume to great results, but if you want to take some extra time and try it out for yourself, go into the detailed settings of your instrument and find where you can automate “MIDI expression”. Modifying this won’t turn down the volume, but rather work within the parameters of expression, which you can control from your MIDI controller. You can also program this by hand. Both ways work, just give it a go and see which method you prefer!
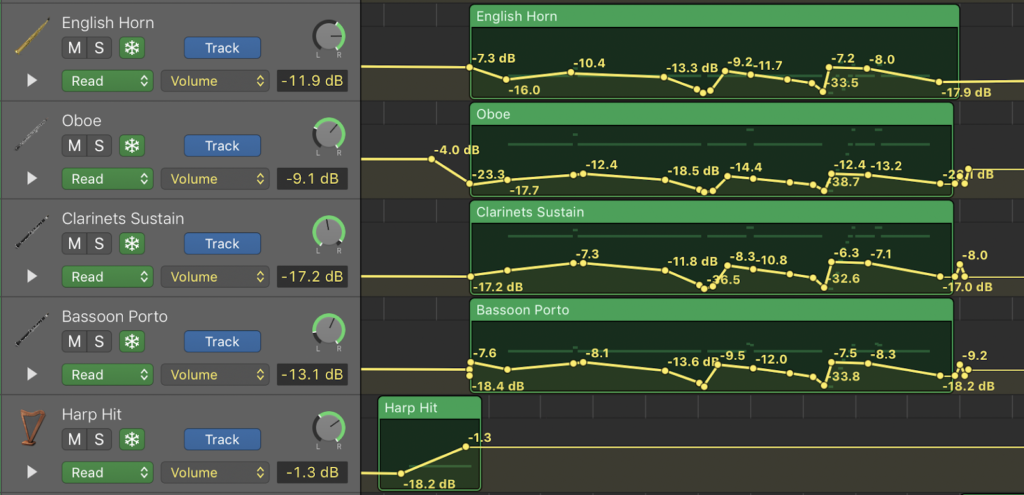
You’ll also see many professional composers automate with hundreds of dots, so in other words, a much more detailed curve formed between the line and the dots. I generally do a 2:1 ratio of dots to lines, but a lot of producers and composers will have something like a 25:1 ratio of dots to lines, which means LOTS of time spent on automation. I’ve discovered that other parts of the production process are more important to giving ultra detailed attention than others, and I usually automate more if I have less instruments, but when I’m hovering 100 tracks, a more simple automation technique will suffice.
I also automate in SOLO for the most part, but always check it right afterwards with SOLO turned off. Many times, solo-ing too much without checking the big picture will lead to an off-balance mix, so make sure to balance when you use SOLO during mixing.
Another element to consider is panning and/or binaural spacing. In this case study, I used a basic panning, which means if I stereo pan to the right by +15 dB, I’m really turning down the left side by 15 dB. There are however, ways to place instruments in a surround sound space, which is when you pan using the “binaural” setting. The basic way to pan is the former technique, but the latter technique will give you a much more detailed and realistic placement of the instruments within the space. So look at an orchestra chart and place them where they belong, like a fun kids game!
Final Thoughts
Creating orchestral music can be tough, especially when you add the challenge of trying to recreate that realistic sound in a DAW (digital audio workstation). Using the three steps addressed in part I of this series, along with some of the advanced techniques of this case study in part II will provide you with some useful nuggets for composing orchestral music in the box.

Get your FREE copy of "The Essential Guide to Film Music Collaboration" to help create better music for your film and video projects.
About the Author
Adam Robert Galloway
Film Composer
Adam is a content creator for Compozly and a fellow music composer. He has been scoring films since 2012 and releasing original & cover songs as Muzikm4n since 2017. Despite no formal training in composition, Adam has spent many years learning how to produce and compose music that provides filmmakers with effective and unique scores.
© 2025 Compozly, LLC ALL RIGHTS RESERVED